
Camellias are grown successfully out of doors in the United States from Long Island, NY, south along the Atlantic Coast, the Gulf Coast, along the Pacific Coast from California to Washington, and in interior sections of the country.
Camellias bloom in late fall, winter, or early spring.There are hundreds of camellia cultivars. Camellia japonica is normally hardy to 10°F, but sudden changes in temperature can damage the foliage or kill open flower buds. Sasanqua camellias are more cold hardy -- tolerating temperature as low as 5°F.
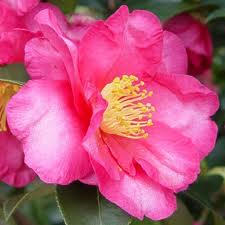
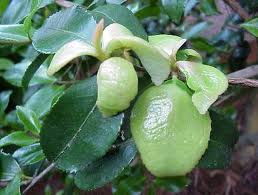
Camellia japonica is a slow growing, broadleaved, evergreen shrub, which may grow to a height of 25 feet, but more often to 6 to 12 feet. It has a spread of 6 to 10 feet. The glossy dark-green, leathery leaves are 2 to 4 inches long. The flowers, which range in color from white to pink and red, are 3 to 5 inches in diameter and bloom from late winter through early spring.
Camellia sasanqua tends to be more open, have smaller leaves, and usually small, single blooms in the fall. Camellia sasanqua varieties are normally faster growing than Camellia japonica.
Camellia Forms


Camellia Flower Forms

Single: One row of not over 8 petals and having conspicuous stamens.
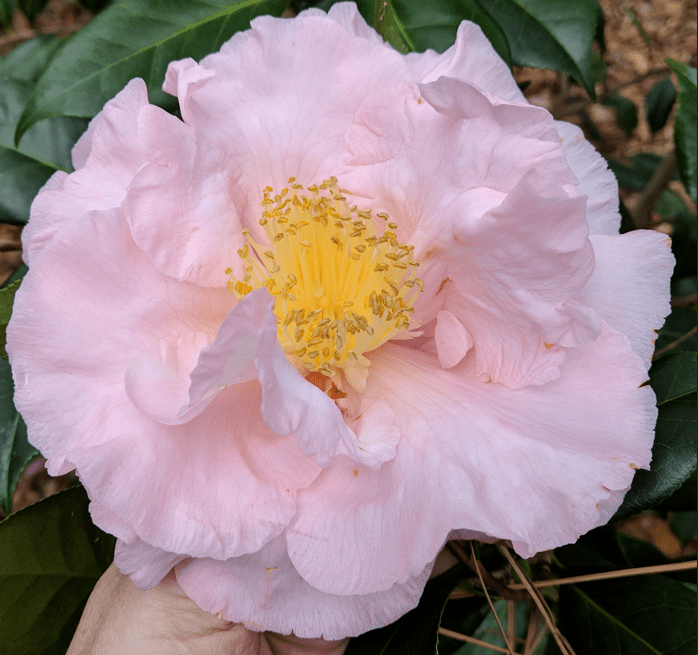
Semi-double: Two or more rows of petals and having conspicuous stamens.

Anemone: One or more rows of large outer petals lying flat or undulating; the center a convex mass of intermingled petaloids
(similar to a petal, but smaller and a bit irregular in shape) and stamens.

Peony: A deep rounded flower of two forms;
Loose peony: Loose petals, intermingled with stamens and sometimes petaloids.
Full peony: Convex mass of mixed irregular petals, petaloids and stamens or with no stamens showing.

Rose Form Double: Overlapping petals, showing stamens in a concave center only when fully open.

Formal Double: Fully overlapping, many rows of petals, never showing stamens.

Flower Size
Miniature
2-1/2 inches or less or 6 cm or less
Small
2-1/2 to 3 inches or 6 to 7.5 cm
Medium
3 to 4 inches or 7.6 to 10.4 cm
Large
4 to 5 inches or 10.5 to 12.5 cm
Very Large
Over 5 inches or 12.6 cm and over
Bloom Time
Sasanqua
Early: Sept.-Oct.
Mid: Oct.-Nov.
Late: Nov.-Dec.
Japonica
Early: Dec.-Jan.
Mid: Feb.-Mar.
Late: Mar.-April

Site

Most camellias grow and produce better flowers in partial (50 to 70%) shade. Plants located in full sun can become less dormant during warm periods of the winter. Plants in a northern or western exposure, or otherwise protected from intense morning sun will usually tolerate more cold weather than those with an eastern or southern exposure. Choose a planting site with well-drained soil. Do not plant where shade trees with shallow root systems will compete with camellias for nutrients and water.
Soil Preparation
Camellias will grow in most well-drained, acid soils. A soil pH (degree of acidity or alkalinity) of 5.5 - 6.5 is best. A soil test made before planting will tell you what is needed to bring the soil to the desired pH and fertility level. Practically all soils need additional organic matter before planting. A mix of 50% soil and 50% humus (peat moss, leaf mold, pine bark, sawdust or cow manure) is recommended. This provides improved fertility of the soil and also improves drainage.
Planting
Camellias are generally planted in the late fall through the early spring although with proper care they may be set out any month of the year. Adequate moisture is a necessity until the roots become well established in the soil. The newly developed roots will then provide enough moisture for the plant to start growth when spring arrives. Allow a minimum of five feet between plants, preferably more, when planting. The following steps should be followed when planting a camellia:
1. Dig a hole at least two feet wider than the root ball.
2. Leave soil in the center of the hole undisturbed to prevent settling, as illustrated. (Fig 1)
3. Place the root ball on column of soil. The top of ball should be slightly above soil level. When planting a container grown plant, brush away the soil from the root ball and loosen up the roots to allow better penetration into the soil.
4. Fill the hole around the root ball with a mixture of top soil and organic matter.
5. Build a berm of soil around the plant three feet in diameter to prevent water from running off.
6. Mulch around the plant with pine straw or other organic matter .
7. Water well after planting and soak soil about once a week during dry weather.
Camellia Care
Mulching

Mulching is very important for camellia health.The material should be placed from about four to six inches from the base of the plant, to as far out as the branches extend.Spreading the surface around the camellias with two to four inches of pine straw, leaves, shredded bark, or other organic matter (but not peat moss) will help eliminate weeds, retain moisture and moderate soil temperature. Do not pile mulch too high, as this can keep the soil too wet and provide good conditions for root rot. Do not pile mulch too close to the base of the plant.
Watering

Camellias prefer moist, but not soggy, soil at all times. Water until the soil is wet to a depth of 14" to 18." Be aware of how much moisture the soil is getting from rain and/or sprinklers, so that the camellias do not get waterlogged. If they do, this can result in problems which may result in death of the plant. (See Diseases: Prevention and Treatment.) A general rule for watering is, "If in doubt, don't."
Fertilizing
There are many recipes for camellia food, and different ideas as to when to apply it. Camellias should definitely be fertilized in the spring following flowering. They may benefit from a feeding earlier, just as the buds form, to give strength to the blooms. Some growers insist that cottonseed meal alone is enough to keep camellias blooming year after year. It is organic, slow release, and does not burn the plants.
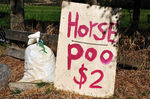
Another excellent natural fertilizer is manure. Horse owners and those who board horses may be delighted to have some of the horses’ extra excrement hauled away. Take the aged manure; if it is fresh, it will burn the camellia roots.
If you prefer quicker action, commercial fertilizers especially for camellias are available. If you have the time and patience, you can concoct your own mixture. Information for doing this is available from a number of sources. Remember that organic fertilizers are safer but slower to show results; commercial ones act faster but have the potential to damage plants by burning leaves and roots. Start with a soil test to find out your soil's particular needs. Camellias prefer a soil pH of 5.5 to 6.5. Your local agricultural extension agent should be able to help you with the soil test.
Pruning

Camellias require very little pruning except for the removal of damaged branches and long shoots that detract from the attractive form of the shrub. If it should be necessary to cut back severely (no leaves left), it can be done safely from Valentine's Day to around the first of May. Cutting out the dead, weak, or diseased stems can be done anytime.
Diseases: Prevention and Treatment

In general camellias are healthy plants with few problems compared to others. Camellias have a few weak spots, however.Root rot and dieback are two diseases that can result in death to the plants. Flower blight poses a serious problem as it disfigures blooms, but it does not cause death or decline of the plant.
Once your camellia has been planted in an area that has enough sun to keep its leaves green and enough shade to shield it from too much sun, it will sustain itself primarily through its roots.Camellia roots need three basic things to keep them happy: nutrients, water, and oxygen.
Some nutrients are naturally present in untreated soil, and some established camellias can survive for years with no attention at all. Most camellias will benefit from additional food that their human caretakers provide, however. Ready-to-use commercial mixes are available, or you can create a special potion to fit your particular soil.
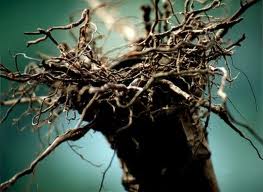
Water dissolves the added nutrients and enables the roots to absorb them. Roots also need a certain amount of oxygen to help in the "digestion" process. If the soil is not properly aerated, and enough drainage is not provided, the roots become waterlogged and can't function as they should. This can lead to a condition known as root rot.
Root Rot
Camellia root rot is caused by a fungus ( Phytophthora cinnamomi ) which occurs in the soil. This pathogen may be found occurring naturally in the soil or it may be brought in on the roots of camellias, rhododendrons, and other woody ornamentals. Most Camellia japonica varieties are susceptible to root rot, while Camellia sasanqua and Camellia oleifera are not as vulnerable.
Root rot is usually associated with poorly aerated or poorly drained soils. Symptoms may appear at any time, but they often show up during periods of hot, dry weather. The first sign of this disease is the stopping of growth either with or without yellowing leaves. In more advanced stages the leaves on one or more branches become gray-green, wilt, and finally die. If the roots are examined they are brown with rot.
Using fungicide as a soil treatment may help. When grafting, use C. sasanqua and C.oleifera as understock. Choose vigorous, fast-growing varieties of camellia plants. Most important, improve the drainage of the soil.
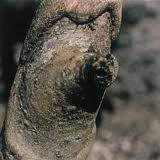
Dieback
Dieback is a serious disease of both C. japonica and C. sasanqua. It is caused by the fungus Glorerella cingulata . This fungus enters plants through wounds resulting from leaf scars, hail injury, pruning cuts, falling branches, insect damage, and lawn mower or string trimmer cuts. Insects that walk across wounds can spread the fungus. It can also be disseminated through moisture splashed on the wounds from rain or regular watering. The disease usually appears during the spring and early summer months.
Dieback is characterized by a sudden wilting of new growth, particularly in early summer. The leaves cling to the branches for a long time after they die. Cankers sometimes appear at the infection point, and may ooze pink masses of fungal spores during extended periods of wet weather.
The best control of dieback is sanitation. The fungus lives inside the plant and spray cannot completely control it. Remove the affected branch about six inches below the lowest visible symptom of disease. After each cut dip pruning tools in a commercial fungicide or a solution of one part chlorine bleach to 10 parts water. Spray resulting wounds with the disinfecting solution. Diseased twigs should be physically removed from the area of the plant, and either burned or discarded in garbage. Spraying plants with a fungicidal solution in the spring during the normal leaf-fall period will help to prevent spread of the fungus.
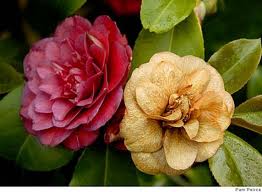
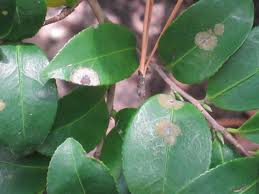
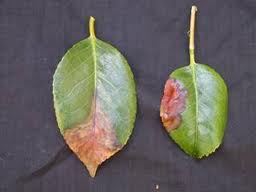
Camellia Flower Blight
This camellia disease is caused by the fungus Ciborinia camelliae. It occurs only on the flower and does not affect the rest of the plant in any way. Since camellias are enjoyed mainly for their blooms, this disease can be really disheartening.
Flower blight is not usually a problem early in the season. It generally appears in late winter to early spring when temperatures are on the rise. It may be seen earlier if conditions are proper for the fungus. Warm, humid weather following a cold spell will cause sporulation of the fungus and subsequent infection. This disease is characterized by brown spots on the petals. These usually enlarge until the entire blossom is blighted. Infected flower tissue feels "slimy" to the touch.
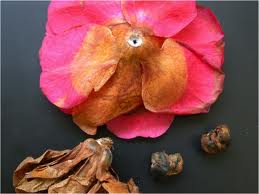
Infected flowers fall to the ground and the fungus produces hard, resting bodies called sclerotia. These sclerotia may remain under the bush or in the soil or debris for several years. Under proper weather conditions (temperatures from 45 - 70° F and wet) these sclerotia germinate and develop saucer-shaped mushrooms (apothecia) about one-half inch in diameter that release spores. These spores are carried by the wind and cause infection when they land on a flower.
Remove and destroy all fallen blooms. Picking up all fallen blossoms every year would disrupt the life cycle of the fungus. This would only be effective, however, if all other camellia growers in the area did the same, as fungal spores can easily blow to another plant. If flower blight has not been found in an area, it is important not to bring flowers or infected soil on plants into this area. Protective fungicidal sprays provide only limited protection. No proven eradication method has been found, although testing continues. Some fungicidal sprays, such as Bayleton, applied weekly will reduce disease incidence but not eliminate it.
Other diseases : Other camellia diseases include leaf gall, sooty mold, lichens, nematodes, and virus variegation. None of these is usually life threatening.
For more information on diseases, visit the American Camellia Society website.


Insects and Pests

There are a number of insects and other pests which can damage camellias, but only a few are of great importance.Many growers fail to recognize the symptoms of insect damage before serious injury occurs. To prevent major problems, examine plants regularly for symptoms of these pests.
Scales
About 90 per cent of insect problems on camellias are caused by scales. They can go unnoticed until after a large population has developed and considerable damage has been done. They suck vital juices from the plant, and several generations of them can develop in a year.
Tea Scale: This is the most common and probably the most damaging insect pest of camellias. Tea scale infests only the underside of a leaf. Male insects appear whitish, while the females are dark brown. Symptoms include yellow chlorotic splotches on the upper leaf surface. A white, woolly-like, cottony-looking mass secreted by the males may show on the under surface of leaves.
Camellia Scale: Like the tea scale, this scale infests only the leaves of camellia plants. The female is light to medium brown and oyster shell-shaped about 1/10 inch long. The male is similar but shorter.
Peony Scale: This scale is less common than tea or camellia scale; however, when present it is a serious pest. Infestations may kill branches and entire plants if not controlled. Peony scale is found on the stems and branches of camellias and azaleas. They are hard to recognize, as they camouflage themselves well. The hard shell which covers their body is blended to match the color of the stems. If the shell is removed, a white, circular waxy spot is left on the stem.
Wax Scale: This scale is also found on the stems and trunks of camellias and many other woody ornamentals. The waxy covering is white or slightly pink, oval, and 1/4 inch in diameter.
Control of Scale: To control scale infestations, spray plants at the first sign of scale. Oil emulsion sprays, a contact insecticide, will give effective control if applied properly. For it to be effective, the plants must be thoroughly covered. Oil emulsion sprays should be applied only during the spring and fall when the temperature is 40 -85°F. Spraying in the heat of the day can result in burning the leaves. As a general rule, apply no more than three times per year with at least 60 days in between sprays. Oils are compatible with other insecticides.
Aphids or Plant Lice
These pests can become a problem during the peak growing time. They are small insects that form colonies on the undersides of leaves or along the stems of tender new growth. They are rarely seen on mature, hardened tissue. They injure plants by sucking their juices with a long beak. Aphids excrete honeydew, a sticky substance which attracts sooty mold. Aphids are relatively easy to kill using a soap spray, although repeated sprays may be necessary.
Mites
Mites are very small, sucking pests that are generally found on the underside of plant foliage. They are difficult to see with the naked eye without using a magnifying glass. Symptoms include a dusty, gray appearance of the foliage. In heavy infestations you may see webs covering infested areas. Heavy infestation may cause defoliation. A single spray of a commercial miticide in mid-May usually prevents severe injury. A second spray applied 10 - 14 days later may be necessary to kill mites which have hatched from eggs. Mites are more severe in a hot, dry climate.
Camellia bud mites are small pests that occur under the layers of vegetative and flower buds. Flower buds with heavy infestations show brown edges on the bud layers early. If left unchecked the buds turn brown and drop before blooming. Thorough spray control is essential to obtain good control of these mites.
For more information on insect and pests, visit the American Camellia Society website.


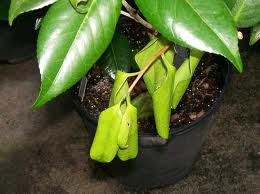
Propagating
Camellias can be propagated by grafting, cuttings, layering, air layering, and seeds.Each of these methods is discussed below.
Grafting

Producing flowering camellias from seed or cuttings is a slow process. One method of producing flowering plants in a much shorter time is by grafting.While it may take three to six years for a rooted cutting to flower, a graft will likely flower the second year.
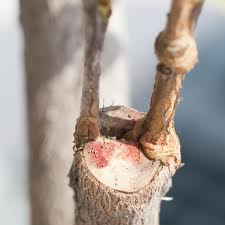
To understand grafting, it is important to know the terms "scion" and "understock" or "stock." The scion is the part of the stem containing a growth bud of the variety one wishes to propagate. The understock or stock is that portion of the plant that furnishes the root system. A stock that is 1/2 inch in diameter is most desirable; larger stocks are generally not suitable for grafting. The best season to graft is late winter to early spring, just before new growth begins. Camellia sasanqua is often used as understock because it is resistant to root rot disease. Cleft grafting is one of the most popular methods of grafting and is described below.
1. Prepare the stock by cutting off the top with sharp shears or saw about 2 to 4 inches above the soil. Make a sloping cut and trim smooth with a sharp knife. Using a grafting tool or a heavy knife that may be tapped with a mallet, drive the blade into the stub to split the stock vertically through the center so a split extends about 2 inches into the branch.
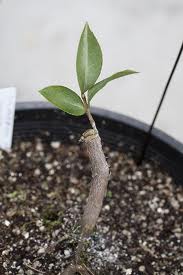
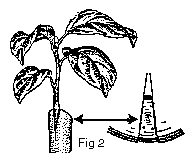
2. Prepare the scion by taking 1 to 2 inches of mature, current season's growth with one or more growth buds from a healthy plant. The scion should have one to three leaves. Prepare the scion by making a wedge-shaped cut at the base. Soaking the scion for up to 30 minutes in a fungicide solution will discourage disease. (Fig 1)
3. Using a screwdriver or knife, hold the slit open in the understock. Insert the prepared scion so that the cambium layers (green layer inside the bark) on the stock and scion match. It is vital that the cambium layers match to have a successful graft. (Fig 2)
4. Hold the graft tight with a rubber band, weatherproof string, or electrician's tape. The union point can be protected with grafting wax, pruning compound, or aluminum foil. (Fig 3)
5. Use a jar or plastic bag to cover the graft and keep the humidity high. It is desirable to cover the soil with an inch layer of sand. Protect the young graft from sun with burlap, paper bag, etc. (Fig 4)
6. Callusing should start within a few weeks and should be firmly knit in about two months. When firmly callused, raise the jar very gradually. If possible, choose a cloudy, humid day when removing the jar to minimize wilting. Raise it a few inches at a time. If wilting appears at any time, put the jar back on until wilting stops. This is the most critical part of aftercare.
Grafts usually grow 15 - 30 inches the first season and often bloom the second year. Do not fertilize the first year.
Cuttings
One of the most common methods of propagating a camellia is by rooting cuttings. It is not the quickest method, but it is the easiest and least expensive way to reproduce plants. One advantage in growing cuttings is that the resulting plants will be exact duplicates of the original plant. However, if the cutting is taken from a branch that flowers a mutation (sport) of the original cultivar, often the cutting will be a reproduction of the sport rather than the original plant.
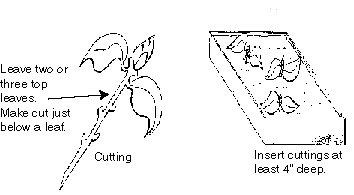
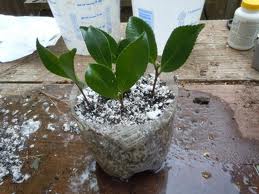
Not all camellias root readily from cuttings, but with good facilities, bottom heat, continuous mist, and rooting hormones, almost any camellia cutting can be rooted successfully. Cuttings of new growth are the easiest to root. They should be taken soon after the tender growth matures and hardens. The cut should be made below the fifth node (the node is the tiny bud-like growth at the base of the leaf junction with the stem). A tapering cut should be made at the base of the cutting. This allows more surface for roots to develop.
To reduce dehydration, remove the leaves from the bottom of the stem, leaving two or three leaves at the top. This will expose eyes from which roots can develop, in addition to those at the cut end. Less leaf surface allows more of the plant's energy to go into producing roots instead of supporting extra leaves.
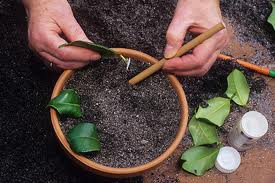
A good growing medium consists of one-half sand and one-half peat. Coarse sand alone can be used, as well as vermiculite and perlite, either alone or in combination with sphagnum peat moss. A medium which is barren of nutrients induces the plant to send out roots in all directions to search for nutrients. Any box, pot, container, or bed at least 4-6 inches deep with good drainage is suitable for the medium. Applying rooting hormone to cuttings before inserting them into the medium may speed up the rooting process, but is not necessary for success.
Place cuttings in mixture about 2 inches apart and 2-3 inches deep. A pane of glass, newspaper, or cheese cloth over the pot will help retain moisture. Cuttings should be kept moist, but not wet, at all times.
Layering
A centuries-old propagating process developed by the Chinese consists of layering (rooting) plants by placing sections of branches that are still attached to the plant in the ground and covering them with earth, having first removed or roughed the bark on the underside. Once roots have developed on the covered branch, it is cut off and planted.
Air Layering
Air layering probably developed from the discovery of the layering process, but with the rooting medium in the air instead of in the ground. It is a simple process and can reproduce good-sized plants in one year. It may be done at any time of the year, but the best time is in the early spring when the plants are beginning to grow. Directions follow.
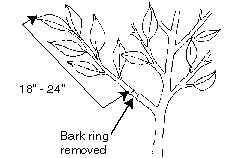
1. On a healthy limb completely remove a ring of bark 1 1/2 to 2 times the diameter of the branch to be air layered. This should be 12 - 18 inches from the tip of the limb. Two parallel cuts should be made with air layering scissors or a sharp knife, and the strip lifted off. Although the branch may have new growth at the tip, the place where the cut is made must be on hardened, mature growth.
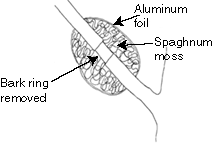
2. Eliminate all traces of the cambium layer (green tissue) by scraping with a knife. Dust the exposed surface with a rooting hormone powder recommended for hardwood cuttings.
3. Squeeze a handful of presoaked sphagnum moss to remove excess water, and cover the ringed area with it. Wrap this tightly with medium weight plastic wrap and secure with twist ties above and below the ball of moss. Cover this ball with a square of aluminum foil, dull side out, to discourage birds' attention.
4. Air layers started in the spring usually form roots by late summer or fall. The air layer will feel harder as it develops roots.
5. When the roots are visible through the moss, or when the root ball feels hard, cut the limb from the mother plant at the bottom edge of the moss with sharp scissors. Remove the plastic.
6. Do not remove the moss as it may damage the tender roots. Best results will be obtained by planting first in a container, although it can go directly into the ground.
Seed
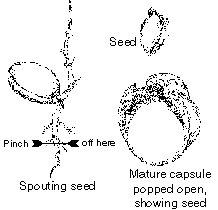
Growing plants from seed presents the gardening enthusiast with a real challenge. Camellias do not come true from seed, and only rarely is a good plant produced. Out of thousands of seedlings, the chances for a superior variety are slim.
Camellia seeds ripen at different times depending on variety and location. If you are not able to plant the seeds immediately upon cracking, soak the seed for 12 hours, or crack the hard coat to help germination. Plant in good soil, peat moss, or a combination of peat moss and sand. Keep the soil damp. Seeds usually germinate in one month. Transplant into containers or outside. Cutting off the tap root will encourage a more fibrous root system.


Bigger And Better Camellias

No matter how lovely a camellia is in its naturally occurring state, someone is always going to want a bloom to grow bigger and more beautiful.One way to force a specific blossom to be larger is to remove all other buds on that stem. This allows the plant to put all its energy into the one remaining bloom. With all that attention, how could it fail?
For those who want an even more dramatic result, there is gibberellic ("jibberELLic") acid, and the process known as gibbing ("jibbing"). Most plants produce small quantities of the growth-regulating chemicals known as gibberellins, and treatment with larger quantities does not seem to affect their blooming habits. With camellias, however, gibbing produces larger, sometimes more intensely colorful blooms, and can also influence when the blooms themselves appear.
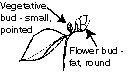
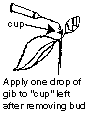
The gibbing process is easy. There are two types of buds on a camellia plant: a growth bud (also called leaf bud or vegetative bud) and a flower bud. The growth buds are slim and pointy; the flower buds are rounded. Select a growth bud next to a nice, plump flower bud. Twist the growth bud until it comes away from the plant, leaving a little "cup" where it was attached. Put a drop of gibberellic acid into the cup, and that's it. Treat each bud just once.
Treat only up to about 20 per cent of the buds on a single plant. Treat different buds at different times so that you'll have a continuous stream of treated flowers. Treat only a few buds on young plants. Gibberellic acid breaks dormancy on a treated bud and encourages growth, but there is no way to accurately predict when the bud will bloom. This can differ from plant to plant. A little experimentation and basic record keeping will show you when to gib for the desired effect. Go to the American Camellia Society website for a video demonstrating gibbing.
Gibberellic acid usually comes in powdered form, to be mixed with water. If you cannot find it locally, it is available online from a number of different sources.